DIY Sound Panels: How to make high performance sound absorption panels cheaply
So you want to sound treat your room but don’t want to spend a bunch on the project? Well, that’s when you roll up your sleeves and do it yourself using a DIY acoustic treatment. This guide will help you do just that, showing you how to make acoustic sound panels from start to finish. 
In this modern-day and age, the world has become a loud place with sources of noise pollution coming from gadgets, streets and neighbors’ homes like never before, particularly in urban areas.
Not only can these sounds lead to hearing damage if severe, but being constantly surrounded by disruptive sounds often has negative consequences such as low productivity, increased stress levels as well as generally high social anxiety.
As a result, many people struggle to find an ideal sanctuary where they can escape the endless hullabaloo of the world outside, like a home theatre with surround sound.
Thankfully, there are a variety of ways to make your own sound absorption panels without too much muss or fuss.
These are easy enough to construct with affordable materials and are perfect for people who are seeking to regain some semblance of peace wherever they spend the most time.
Look no further than the steps below to find out exactly how you can take back your peace of mind in no time at all.
I am an Affiliate for Amazon and others, which means I may make a commission if you purchase something through the links here. There is NO extra cost to you at all, and THANK YOU so much for the support. Learn more here.
Related: How to soundproof a garage
Contents: Skip to section
Conduct the clap test before you start
You might already be convinced that your room needs some kind of soundproofing, or you might be sitting on the fence and wonder if you should proceed.
Well, the good news is that you can actually conduct a simple experiment to determine if you need acoustic treatment in your home recording studio or room: The Clap Test.
How it works is that you need to walk around the room, and clap as loudly as you can, at every single spot. This might not be practical, so I suggest you try to do so at least every other step you move.
In essence, you need to listen out for the following:
- Metallic ringing sound that seems harsh on the ears – Needs more sound absorption
- Gentle reverberation that does not seem out of place – can do with less sound absorption
- Sound lingers on after clapping – will cause acoustical problems, need to treat
- Sound dies off quickly after clapping – room is well treated and has good sound qualities
Conducting this test gives you a sense of where your room is at and if you should continue installing acoustic sound panels.
Why do you need soundproof panels?
Acoustic soundproof panels are highly-reviewed by users for their capacity to block sounds as well as their sound absorption properties.
They can also help limit the reverberating of sounds throughout a room by softening echoes or other airborne noises.
This is all possible due to the permeable nature of the sound insulation panel’s fabric and spongy insulation materials which are highly effective at dampening sounds.
While individual brand-name acoustic foam panels aren’t usually very expensive, buying enough for a large-scale sound treatment project used to set most people back a pretty penny.
This is no longer the case, with copious DIY tutorials popping up on the web every other day including the one you’re currently reading.
This guide will help you get the most bang for your buck as you carefully plan the best method to take on your noise issues.
The steps are all streamlined, meaning they’re as easy to follow as it will be for you to fall asleep at night once they’re done.
Your oasis of silence awaits!
Related: Best Quiet Fans
Who can benefit from making their own soundproof panels?
Anyone who lives in an urban setting could take advantage of the several benefits afforded by sound-treating a room using acoustic panels.
From screaming kids playing in the streets to the honks and screeching tires of traffic jams, cities can be downright deafening places and many apartment dwellers frequently have to put with all kinds of noises through the paper-thin walls common in modern construction.
Even homes can benefit from soundproofing treatments, especially those with a lot of occupants that have different schedules and daily routines.
Acoustic panels allow night owls to watch TV in the living room and go to the toilet without worrying that they’ll disturb any early birders already slumbering with a late-night flush.
Those who crave a home theatre should be thrilled to know that sound panels are a revered staple. Thanks to their sound-absorbing nature, they’re great at stopping reflective sounds from bouncing off the walls and ceilings.
Some of us will opt to use them to soundproof a home studio, perhaps for drumming sessions. Some of us are probably concerned with noises entering the nursery and disturbing their babies.
Whichever is the case for you, soundproofing with DIY acoustic panels is always a way to reduce noise for your family and you.
Related: How to soundproof an apartment door

By strategically placing them around your living room, they’ll allow you to only funnel in the sound from your speakers by eliminating any ricocheting noises before they reach your ears, making for an audibly clearer movie-watching experience in your home theater.
For people whose work tends to be louder than most, such as people who work in the music industry or with industrial tools, acoustic panels are also a solution to your noise production problem.
Not only does sound-treating your workspace from outside distractions help to boost your productivity, but you can also rest assured that your own rambunctious activities won’t bother anyone else in the vicinity.
DIY acoustic panels are excellent at preventing sounds from leaking through walls or other hard surfaces, thus providing adequate noise isolation for everyone around.
Now you’ll be able to enjoy having a home theatre without worrying about getting complaints from your neighbors or having to sacrifice a quality film experience.
Related: How to soundproof your bathroom
What do they do and do they really work?
Acoustic panels work by trapping sounds in their fabric or sound absorbing material instead of letting them escape through the air. They’re renowned for their ability to render rooms much quieter and will help to vastly improve the acoustics in any given room.
They decrease noises by turning acoustical energy from sound waves into kinetic energy or heat which can then dissipate for optimal sound reduction.
In this article, you’ll discover the simplest ways to create your own acoustic panels in a few, easy steps for those who truly want to get proactive about sound treatments.
It should take you no more than one free weekend so if you’re feeling a little crafty, this activity is a great way to save a few bucks and your future sanity at the same time.
You should start by determining exactly which areas in your home or workspace would benefit the most from an acoustic sound panel.
This is important because, depending on where sounds hit first, you could fall right into the path of their reverberation so it’s best to prevent these where possible and to stop such early reflections.
This will also help you determine just how many wood panels and other materials you’ll need to buy to get the job done right. This article will entail a guide on how to construct four 2’x4’x4” sound panels by hand but the measurements can also be adjusted accordingly to create bigger or smaller panels.

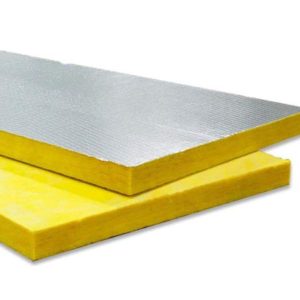
The sound panels will need to at least be able to absorb a mid- to high-range frequencies so sound insulators like stone wool, fiberglass, acoustic cotton and acoustic foam are best.
Due to their higher density, fiberglass and stone wool can absorb frequencies of down to 100 Hz whereas acoustic foam can only absorb frequencies of down to 500 Hz.
This makes fiberglass and stone wool superior insulators for sound treatments but they tend to be more costly.
Using these materials, you can create sound panels that are meant to be free-standing for convenient relocation or mounted to a wall or ceiling for a more permanent fix.
You can also customize the sound panels by wrapping them with a fabric cover that matches your decor or by using a special print of a photo or a painting to really liven the place up.
These panels should be dense and sturdy, measuring at least two to four inches thick since thicker panels are better able to absorb low frequency sounds such as bass. If you are specifically trying to block out such sounds, building a DIY bass trap might be a better solution.
Their accompanying insulation batts should also be high density, having a rating of three to eight pounds per foot cubed such as the insulators below.
Related: How to soundproof a dog crate
How thick should acoustic panels be?
Typically, they should be made to be at least 2″ to 4″ thick. You would need to consider the kinds of sound you wish to treat for. Generally, mid to high frequency sounds can be treated with a 2″ panel, although you might need a diffuser in the higher frequency ranges.
If you are targeting lower frequency sounds, a thicker sound panel is necessary, much like a bass trap.
You would also want to consider the size of the room. With 4″ boards, your room is going to get shrunk pretty dramatically.
Things You’ll Need for Four 2’x4’x4” Sound Panels
Tools
-
Measuring Tape
-
A handheld serrated saw or an electric version
-
An electric drill with different bits
-
32 long screws
-
A staple gun
- Staples
- A serrated carving knife
Materials
-
Gloves
-
Spray adhesive
-
Wood glue
- Six 8’X4”X1” pieces of timber
- Four yards of 60-62” wide sound-transparent fabric of choice
- Four batts of 2’X4’x2” insulator of choice: Fiberglass or Mineral wood
-
Heavy-duty D-Ring hangers
*Click to check price
Steps for making your own DIY Sound Panels
Step 1
To make 2’X4’x4” sound panels, start by cutting four of the boards in half with the saw to make eight 4’ pieces and the other two boards in fourths to create eight 2’ pieces.
Make sure to use the measuring tape to ensure that every piece will be the correct size because it’s best to measure twice since you can only cut once.
The last thing you’ll want is uneven panels.
Step 2
Sequentially, you will use the cut timber to build the frame of a panel, or alternatively you can choose to use furring strips. These are easily available in hardware stores, Amazon or Home Depot.
Take two 4’ pieces and lay them on their sides parallel from one another, then take two 2’ pieces and place them perpendicular to the other two but parallel to each other just inside the longer, outer pieces to form a frame.
You should have a large rectangle with all the wood pieces on their sides and the shorter 2’ pieces on the inner sides so the total length of each panel still would be 4’ and not 4’2”.
Optionally, you can use wood glue to hold these pieces before drilling but you should wait at least a few hours for it to dry.
Step 3
If you decided to skip the last step, then you can go straight to using screws and the drill to hold your newly-assembled frame in place.
Using a 7/64″ drill bit, drill two pilot holes into the top outer half and the bottom outer half of each long 4’ piece, being careful to make sure that the holes are about half an inch away from the edge. You can use a similar drill bit size if you do not have this.
This way the screws can be drilled into the center of the shorter 2’ pieces and creating pre-drilling pilot holes first will also allow the screws to go into the wood more easily later, allowing for straighter alignment.
You should now have a rectangle with four holes on each longer side, two at the tops and two at the bottoms, through which screws can enter to connect the two shorter sides via the corners.
Once you’re satisfied with the straightness of your corners, drill in all the screws completely until they are flush with the surface of the frame. You’re officially about a third of the way done with that step complete and now it’s time to fill the frame with insulation.
Step 4
It’s best to put on thick gloves for this next part since insulation items such as fiberglass can be irritating to bare skin when exposed.
You will probably need to cut the 2’x4’x2” batt of whatever insulation you have chosen down to size a bit as the internal size of the frame is probably smaller than the batt.
Use the measuring tape to determine how much insulation you’ll need to trim off the batt with the serrated, carving knife for it to rest firmly in the frame.
The snugger the fit, the better the sound isolation will be.
Before placing the insulation batt into the frame, make sure to use the adhesive spray to completely cover the insulation batt first.
This way the adhesive will help to hold the batt in position within the frame for more durability.
Place the sprayed batt into the wooden frame and allow it to dry for a few hours, thus bringing you to the last leg of the construction and the most decorative part.
Step 5
As fabrics are the thinnest parts of sound panels, it won’t matter much what you choose to wrap the wooden frame with as long as it’s sound-transparent.
This means that the material will allow sounds to pass right through it into the insulator instead of reflecting off the material and producing more sound waves.
You can test this yourself by trying to blow air through the fabric with your mouth.
Any resistance to airflow eliminates it from the list and some materials to definitely stay away from would be vinyls, leathers and acrylics.
Step 6
After deciding on a fabric that suits your needs and your tastes, take an uncut piece and lay it down on a flat surface before placing the now-dry wooden frame in the center.
Before cutting the fabric, you’ll need to ensure that there’s enough to cover the entire front of the face-down panel as well as enough to wrap around to the back with a couple inches of breathing room.
Once again, measure twice and cut once, and then staple the extra fabric into the backside of the frame using the staple gun.
Take care to pull the fabric as tautly as possible while stapling to avoid getting any wrinkles.
Alternatively, you can also apply more adhesive spray for better hold before stapling but, for the most part, you’ve reached the end.
Wash, rinse and repeat until you have the necessary amount of sound panels you need.
Each of these DIY sound panels should only cost you about $30 dollars to make which is surely chump change compared to what the retail versions are selling for these days.
Step 7
Now feel free to hang your new sound panels but ordinary nails might be too weak to hold up such heavy frames all on their own.
Consider this akin to hanging a heavy piece of art which will probably require the installation of two heavy-duty D-Ring hangers per sound panel.
Just remember, the wider the air gap between the wall and the sound panel, the more effective the sound absorption so aim to leave room for an inch or two.
And like that, voila, you’re done making your wall panels.
Related: Easy ways to make a soundproof box
How do you mount the DIY acoustic panels?
After creating your sound panels, it is time to mount them and test its effectiveness. So how do you go around doing that then?
A common method people use is to simply covering the entire wall with sound panels right away, but that is actually counter productive.
Remember the clap test I mentioned earlier? Use that to determine if your wall panels are sufficient.
You can start off with 50% wall coverage, since most experts recommend a rule of thumb of somewhere between 20%-80%.
Mount them in a chess board design (refer to below image). On the other side of the room, i.e the opposite side wall, mount them in an alternating manner (Black takes the place of white and vice versa).

The point of doing this is to keep the reflection point open. By using one well made panel, it is enough to kill standing waves.
If the acoustic panel does its job as it should, then sounds will be absorbed effectively, without the need for the other side of the room to have another sound panel.
Conduct the clap test and adjust accordingly. In my experience, 50% is a pretty good amount to start and end with.
The way to mount them should be treated with care as they can weigh quite a fair bit. You should treat it like hanging a piece of heavy wall decor or wall art and take the necessary precautions.
I have found this video that explains a method pretty well so do check it out.

Recommended Alternatives
Here is a comprehensive list of insulation materials you can readily find on Amazon to help you complete your home improvement project.
Owens Corning Fiberglass 703 24”x48”x2” Boards
Rockwool Acoustic Mineral Wool Insulation 80
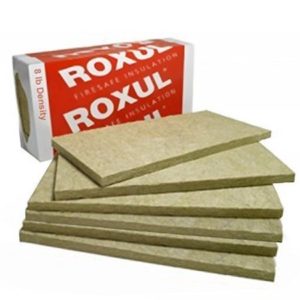
Roxul Rockboard 60
ATS Acoustics Rigid Fiberglass Board
All the other materials mentioned on this list are available through local hardware stores but insulation is much more affordable if bought online as they can typically cost as much as $3-4 per square foot or more in retail shops.
These are easily the costliest part of making DIY sound panels but just know that they’ll allow you to stretch your dollars further in the end.
I found that Amazon offers some of the best prices (as I have purchased them a number of times over the years), while Home Depot runs a close second.
Alternatively, I have heard of people saying good things about Knauf insulation, which is a German brand famous for making drywall gypsum boards. Unfortunately, I have not tried them out nor know where to get them. I suppose those of you in Europe will have easier access to it.
Fiberglass insulation can come into the picture too.
Frequently Asked Questions (FAQ)
What is the best material for sound absorption?
For the best sound absorption, you’ll want materials that are soft and porous, not hard and impenetrable which can reflect more noises. Sound-transparent fabrics and acoustic foams excel at absorbing sounds, for example.
Would making my own sound panels be expensive?
Actually, it’s actually cheaper than buying professional acoustic panels, which can cost at least $50 per 2’x4’x2” compared to constructing one of the same size on your own for nearly half the price.
Do acoustic panels soundproof?
Acoustic panels can help to reduce noises by dampening them through absorption but this is not the same as soundproofing which is a more involved process. The panels do significantly help decrease the reflective sound waves like echoes, however.
Do acoustic panels soundproof?
You’ll want a fabric that is sound-transparent and non-resistant to airflow since this renders it more absorbent, instead of reflective, making for better sound dampening. Beware of nylon, however, which is sound-transparent but also retains moisture, possibly producing mold.
Can you use cardboards to make a sound panel?
They are not as effective as professional solutions and can produce decent results. Choose to use E-fluting corrugated cardboards if you are trying to use cardboard for soundproofing.
DIY Sound Panels: Conclusion
DIY sound panels are useful for sound-treating a room, whether for entertainment or work purposes. They only require a bit of skill to build along with a handful of power tools and other necessary materials.
Still, with any home improvement project, things can go wrong if you’re not careful.
Some important things to remember when constructing a sound panel are to:
- Measure everything twice before cutting
- Pre-drill pilot holes in the wooden frame for easier screwing later
- Wear thick gloves when handling the insulation material
- Select a sound-transparent fabric to wrap the wood frame in
- Hold the fabric tautly when stapling to avoid wrinkles
If you follow these steps, your home studio should be acoustically improved in no time, with an audible difference in the sound quality.
Just don’t forget the popcorn.
